Creating Linux bridging / tap devices with tunctl and openvpn
This article was posted by Matty on 2009-12-20 10:28:00 -0400 -0400
The more and more I play around with KVM virtualization, the more I realize just how useful Linux bridging is. In the Linux bridging world, a bridge device simulates a multiport Ethernet switch. To connect to the switch, you create a tap device that simulates a port on that switch. Once you have bridging configured on your host, there are two prevalent ways of going about creating taps. The first method is through the openvpn program:
$ openvpn --mktun --dev tap0
Fri Apr 24 15:14:26 2009 TUN/TAP device tap0 opened Fri Apr 24 15:14:26 2009 Persist state set to: ON
This will create a tap device named tap0, which you can configure locally or assign to a virtual machine running on the host. The second way to create a tap is through tunctl:
$ tunctl -u root
Set ‘tap0’ persistent and owned by uid 0
This will also create a tap device named tap0, and will set the owner of the interface to root. Once a tap device is created, you can configure it just like any other Ethernet interface. Nice!
Backing up your COMSTAR storage configuration
This article was posted by Matty on 2009-12-20 10:08:00 -0400 -0400
I have been playing around with the COMSTAR iSCSI and FC port providers for the past few months, and other than a number of problems with the emlxs driver, they appear to work pretty well. As I’ve been experimenting, I wanted to back up my configuration in case something happened to my server. COMSTAR uses SMF and the underlying block device to store configuration data, so you can use svccfg to backup the configuration:
$ svccfg export -a stmf > comstar.bak.{DATE}
If you ever need to restore the configuration, you can attach the storage and run an import:
$ svccfg import comstar.bak.{DATE}
COMSTAR has some serious potential, and I’m looking forward to seeing the project grow in 2010!
Expanding VMWare guest storage and extending LVM volumes and ext3 file systems to use the new storage
This article was posted by Matty on 2009-12-13 12:37:00 -0400 -0400
One of my production vSphere virtual machines came close to running out of space this past week. Expanding guest storage with vSphere is a breeze, and I wanted to jot down my notes in this blog post. To expand the size of a virtual disk, you will need to open the virtual infrastructure client, right click your guest and click “Edit Settings”. Once the virtual machine settings window opens, you will need to navigate to the disk that you want to expand. On the right side of the screen, you can click in the “Provisioned Size” text box and specify the new size of the virtual disk:
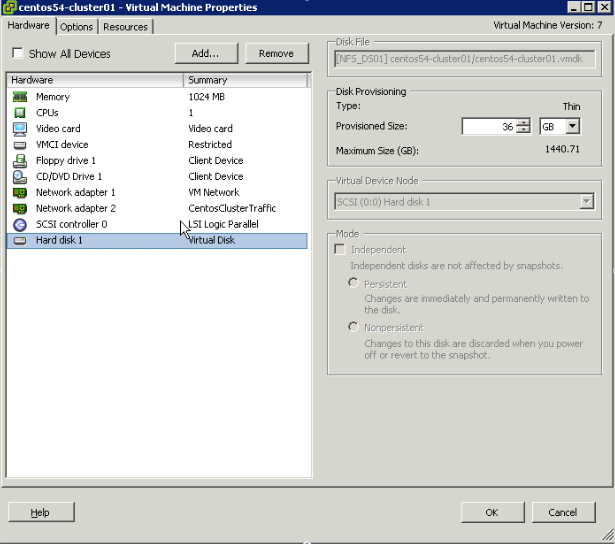
Now, assuming this is a Linux host, you can run fdisk to see the current size of the disk (replace /dev/sdb with the device that corresponds to the virtual disk you expanded):
$ fdisk -l /dev/sdb /dev/sdb1 /dev/sdb9
Disk /dev/sdb: 19.3 GB, 19327352832 bytes
255 heads, 63 sectors/track, 2349 cylinders
Units = cylinders of 16065 512 = 8225280 bytes

Disk /dev/sdb doesn't contain a valid partition table
Fdisk still shows the disk as 18GB in size, so we will need to rescan the SCSI bus to pick up the changes:
$ /usr/bin/rescan-scsi-bus.sh -r -i
Host adapter 0 (mptspi) found.
Scanning SCSI subsystem for new devices
and remove devices that have disappeared
Scanning host 0 for SCSI target IDs 0 1 2 3 4 5 6 7, all LUNs
Scanning for device 0 0 0 0 ...
OLD: Host: scsi0 Channel: 00 Id: 00 Lun: 00
Vendor: VMware Model: Virtual disk Rev: 1.0
Type: Direct-Access ANSI SCSI revision: 02
Scanning for device 0 0 1 0 ...
OLD: Host: scsi0 Channel: 00 Id: 01 Lun: 00
Vendor: VMware Model: Virtual disk Rev: 1.0
Type: Direct-Access ANSI SCSI revision: 02
0 new device(s) found.
0 device(s) removed.
If the rescan completes without issue, the new space should be available:
$ fdisk -l /dev/sdb /dev/sdb1 /dev/sdb9
Disk /dev/sdb: 38.6 GB, 38654705664 bytes
255 heads, 63 sectors/track, 4699 cylinders
Units = cylinders of 16065 512 = 8225280 bytes

Disk /dev/sdb doesn't contain a valid partition table
This is rad, though the physical volume, logical volume and file system know nothing about the new space. To expand the physical volume to make use of the space, we can run pvresize:
$ pvresize -v /dev/sdb /dev/sdb1 /dev/sdb9
Using physical volume(s) on command line
Archiving volume group "data_vg" metadata (seqno 4).
No change to size of physical volume /dev/sdb.
Resizing volume "/dev/sdb" to 75497088 sectors.
Updating physical volume "/dev/sdb"
Creating volume group backup "/etc/lvm/backup/data_vg" (seqno 5).
Physical volume "/dev/sdb" changed
1 physical volume(s) resized / 0 physical volume(s) not resized
$ pvdisplay /dev/sdb /dev/sdb1 /dev/sdb9
--- Physical volume ---
PV Name /dev/sdb
VG Name data_vg
PV Size 36.00 GB / not usable 3.81 MB
Allocatable yes (but full)
PE Size (KByte) 4096
Total PE 9215
Free PE 0
Allocated PE 9215
PV UUID dNSA1X-KxHX-g0kq-ArpY-umVO-buN3-NrPoAt
As you can see above, the physical volume is now 36GB in size. To expand the logical volume that utilizes this physical volume, we can run lvextend with the physical extent values listed in the pvdisplay output:
$ lvextend -l 9215 /dev/data_vg/datavol01
Extending logical volume datavol01 to 36.00 GB
Logical volume datavol01 successfully resized
$ lvdisplay /dev/data_vg/datavol01
--- Logical volume ---
LV Name /dev/data_vg/datavol01
VG Name data_vg
LV UUID E2RB58-4Vac-tKSA-vmnW-nqL5-Sr0N-IR4lum
LV Write Access read/write
LV Status available
# open 0
LV Size 36.00 GB
Current LE 9215
Segments 1
Allocation inherit
Read ahead sectors auto
- currently set to 256
Block device 253:3
Sweet! Now that the logical volume is 36GB in size, we can use the resize2fs command to increase the size of the ext3 file system that resides on the logical volume:
$ resize2fs /dev/data_vg/datavol01
resize2fs 1.39 (29-May-2006)
Filesystem at /dev/data_vg/datavol01 is mounted on /datavol01; on-line resizing required
Performing an on-line resize of /dev/data_vg/datavol01 to 9436160 (4k) blocks.
The resize2fs utility will take a few minutes to run, and should tell you that it is increasing the size of the file system to some number of blocks. If this step completes without error, you should see the new space in the df output (this assumes the file system is mounted):
$ df -h /datavol01
Filesystem Size Used Avail Use% Mounted on
/dev/mapper/data_vg-datavol01
36G 17G 18G 49% /datavol01
Using the steps listed above, I was able to double the size the virtual disk attached to my virtual machine. While this procedure should work flawlessly, I provide zero guarantees that it will. Use this procedure at your own risk, and make sure to test it out in a non-production environment before doing ANYTHING with your production hosts!! I really really dig vSphere, and hope to blog about it a ton in the near future.
Keeping up to date with CentOS happenings
This article was posted by Matty on 2009-12-13 11:32:00 -0400 -0400
I just found out the folks in the CentOS community have a planet feed! If you are interested in keeping up to date with all things CentOS, you should add their feed to your RSS reader.
Configuring an OpenSolaris host to use a static IP address
This article was posted by Matty on 2009-12-13 11:01:00 -0400 -0400
I installed OpenSolaris 2009.06 yesterday, and noticed that the installer doesn’t give you the option to configure a static IP address. Network address are retrieved via DHCP, which isn’t an option for this host. To configure the host to use a static IP address, I changed the /etc/nwam/llp file. Here is the file before:
$ cat /etc/nwam/llp
bge0 dhcp
And here is the file after:
$ cat /etc/nwam/llp
bge0 static 192.168.1.33/24
Now my host can take advantage of NWAM, and use the static IP I allocated for it!